Thursday 29 December 2011

Post-Christmas Lazy Days

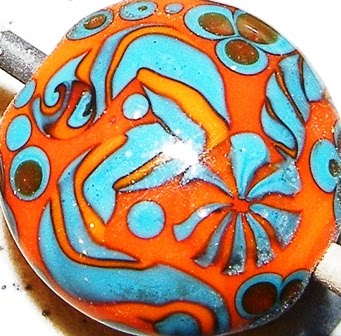
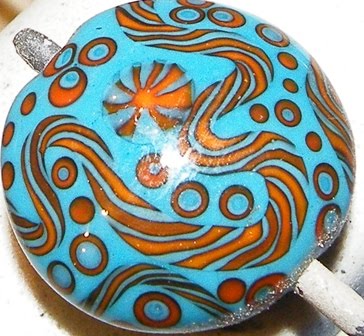
Bead of the Day: "Ebay 1.6m Assortment"


Christmas is behind us, and the New Year is coming. I love these days: they are always so lazy - if you've got nothing planned, like me. Of course, there are bits and pieces to do, but generally it's relaxing after the pre-Christmas rush.


We had Rod's sister staying with us over Christmas, we went out for dinner on Christmas eve, as we always do, and for lunch on Boxing day, and it was her treat for us. There will be visitors in the next couple of days, the children's friends. I haven't been doing much in terms of bead making, and today is a lovely day, not too cold, so I will probably attempt to start on my tutorial for Bead magazine. It will be on making the Matrioshka bead, the winner of the British Bead Awards 2011. Although the actual article will be going into one of the summer issues of the magazine, they need the material for the 18th January, so I'd better get on with it. The actual making of the bead isn't complicated, but there will be many steps, especially on the shaping. So I'm looking forward to this challenge.


Also, and now it's not too early to reveal this little secret, one of my beads was included into the "Flow" magazine gallery of the winter issue, which is usually the issue dedicated to women in glass. I've had to keep it a secret until the issue was out, and now it's available, as I understand, but I haven't received my complimentary copy yet :(. I was also putting in some info about my book, but I haven't heard from them, so possibly they haven't liked it and didn't include the little promo write-up. Never mind.


Well, I hope you all are having a lovely festive season, and I'll be keeping you up to date with what's going on here. And I've started putting my "bargain" bead assortments on ebay, hence the photo of the Beads of the day. I don't think they are going to be too expensive, so if you are looking for some beads to practice your jewellery-making techniques on, they are there!:)

Thursday 22 December 2011

And the Winner Is...


And the winner of the Festive Prize draw is Jane Tyrrell! Jane writes a wonderful blog (http://jane-janesjournal.blogspot.com/) of which I am a follower. She also has an Etsy shop (http://www.etsy.com/shop/janesgemsandjewels ) where she sells beautiful jewellery and cards that she makes. Jane is a very talented jeweller, so it would be great if she lets me have a pic of what she's made with the "Morning Glory" beads. Thank you, Jane, for your support and I hope you have a lovely Christmas and a healthy, prosperous and peaceful New Year!


Apart from doing the Prize Draw, I've been thinking about starting a business page of Facebook for Nelli Rees Lampwork. The thing is, that although everything takes a lot of time for administration, it will give me a great chance of putting the links to my Etsy and ebay listings, especially if and when I put new beads and jewellery for sale. Whenever I do it on Facebook on my personal page, I always feel like I'm bugging my FB friends with my business things. My personal FB page is kind of for my "personal" things and announcements. I think it would be a good idea to split the two. So if you, my dear followers, get an invitation to "like" my new business page on FB, this is the explanation why I've done it.


Also, as you might know, my husband Rod has been writing "The Demi-Monde" books - saga, as they call it now, because there are four books in this series. It's been very close to both of us, as Rod asks me sometimes to proof read his work, and we do discuss the plot and the characters. So I'd also like to let my friends know what's happening on the Demi-Monde side of things, and again, I'd rather use my business page for these announcements.


I've looked into it, and it's not difficult, I'll just need to put some pix together to post on my profile etc, and I'll be in business! Talk to you soon!:)

Saturday 17 December 2011

Festive Prize Draw


Bead of the Day: "Morning Glory"


The heating in the house we are in has decided that it's going to celebrate Christmas by not working. Yesterday the boiler gave up; thank goodness, there is a gas fire in the living room, it's not amazingly hot, but at least it gives out flames - to cheer me up.


On the bead front I've been busy this week sorting out all my beads, old and new, so in the next few weeks I'll be putting strands of 80+ beads on ebay. There are all sorts, as you can see from the photos:


I've got three Tesco's "15 Caramel and Belgian Chocolate Bites" tub-fulls of beads: two of them - beads made on 2.4mm mandrel and one - on 1.4mm mandrel. Now you know what I like to eat from time to time - alas, these three tubs have been empty for a long time (chocolate-wise, I mean:)).

It's this time of year when families get together, we give presents to each other, we celebrate and feel excited for the new year to come and bring us amazing adventures. So I'm announcing a Festive Prize Draw for the followers of my blog: this beautiful and happy bead set of three "Morning Glory" lentils and three etched white donut beads to give away to one lucky follower of my blog! The lentils have my "Morning Glory" design on one side which comprises two pink flowers, several bright yellow and orange "buds" and a variegated vine going around the flowers and buds. The design is raised. The other side of the lentils does not have a raised design, but there are sways of several shades of green glass there. You can make either three pendants out of this set, or a necklace/bracelet. The pix were taken, as is usual with me, in the natural light, so I think the green on the photos is a bit darker than it is in real life - there wasn't much sun today in Derbyshire, just snow!:)


To participate in the draw just send me either a comment on this post or an e-mail - whichever is easier for you. I'll draw the name of the winner on Tuesday, the 20th December, so that, hopefully, the beads reach you before Christmas. Good luck!

Friday 9 December 2011

New Designs for Christmas


Bead of the Day: "Winter Wonderland"


The last post proved to be very popular, so thank you all who made comments here on the blog and on FB - very much appreciated, especially that I realise that I need a tutorial on how to use these tiny thingies.


Yesterday was - at last! - spent at the torch. Well, half of the day to be honest. There are always things in the way when you are at home, especially near Christmas time. I won't go into detail, but in the afternoon I finally got back in front of the torch - yey! I had lots of ideas, as you do when you've been away from it for such a long time, so I started melting glass happily, feeling extremely inspired. I made several focal beads, all of them with my own murrini, decorated with goldstone, silvered ivory stringer, the base bead was out of dark irovy overlaid with crystal clear in places, and of course, lots of Double Helix Aurae - for the lovely Christmas sparkle. I love Aurae - easy to get good results and it can be reduced into so many shiny colours: silver, gold, copper, and even gold and copper - with many shades. The bead with the murrini was dedicated to the star which was born for Jesus.


However, I'm using past tense here. This is because... Sadly, all my beads broke. I work in the conservatory, and to make sure there is plenty of fresh air, I open windows and the door. Yesterday was an exceptionally windy day, so no matter how hard I was trying to keep my beads in the flame, obviously, it wasn't enough. I was sad when I saw them all cracked, but I'm not anymore. I just need to work harder. The other thing is, I like the design I've come up with, especially with the star, so I'll be using it again - and it's not windy today!


One more thing to mention: I've decided to hold a raffle for my dear blog followers, and the set of beads that I'm going to give away is almost ready, I just need to make one more bead - it's always the way, isn't it? So I'll be "officially" announcing it in a couple of days, so that the beads would get to you in time for Christmas! :)

Tuesday 6 December 2011

Cable Thimbles - Almost a Product Review

Some of you who have been on FB recently might have heard that I've been making jewellery. That literally means NO making beads. I've been missing the flame and the cold in the conservatory, where my "studio" is at the moment. But. One has to do what one has to do. So many beads, so little time!


A while ago I bought these little "cable thimbles" from Palmer Metals - this company does offer best prices on sterling silver and some other stuff. I forgot all about the thimbles, as you do! So today, while looking for something else - again, those of you who have been on FB will be able to imagine just what this means on my desk! - I came across these little fellars and I thought, I'd give it a go.


The bracelet I was working on was almost ready: I only needed to attach my toggle clasp. While it is the "finishing touch" on a jewellery piece, everyone knows that attaching a clasp could take longer than making the actual bracelet itself. The first end was easy: I always start with the toggle, and here I had a lot of space wire-wise, so I pulled the stringing wire and hid it under the bead - no problem. AND I THOUGHT: hey, this is great! My bracelet ends are going to look soooo neat and professional!!! And I would do anything (well... to an extent!) for my jewellery to look just that. And I went on to attach the "toggle ring"...


... put the wire through the first groove...


...and back into the opposite one...


...got my toggle ring on...


...and began to pull the wire, and that's where all the problems started. You can see, that the thimble simply disintegrated.


It took me ages to arrange it in the way which would be acceptable to my own quality control and to customers. Another thing was happening: the tiny crimp kept getting onto it as well, unfortunately, I haven't got that photo, I was too stressed to let go of my work and take the camera to take a shot!


Verdict: at 16p per thimble (remember, you'd have to have two - for each end) as an addition to your cost and having spent a good twenty minutes putting it on... sorry, I don't think so. BUT: if you've had better experience with these, please do share it!

Wednesday 30 November 2011

Quirks, Wirework and the Washing Machine Accident

Bead of the Day: "Byzantine"


"Byzantine" has to be the bead of the day: it always cheers me up, and I get into a super-good mood when I make them. And today is one of those days: you either love it or you hate it. Or you just laugh at it - that's going to be my choice!


I've been trying to make lots and lots of jewellery recently. It's near Christmas, and I've got some beads that I can use for bracelets and things, so - great, let's do it! But, of course, I've also been making beads, so the actual jewellery-making keeps being postponed - bead making taking precedence. Today I also decided to wash pillows - god knows why, it's difficult to dry them even in dry weather! So those of you who have been on FB realise where it's all going to. Yes, the pillow exploded inside the washing machine. Never ever anything like this has ever happened before. I opened the door and... duck feathers were everywhere! Well, thanks to good friends Nicky Townsend and Jan Edwards (Jan is a writer, by the way) - they told me what to do, hoover time!!!


Then I went back to my jewellery. I had this lovely idea of making this bracelet using some of my wirework skills. All of you brilliant wireworkers, I admire your patience and reserve! After about two and a half hours (!!!) of sweating and managing to cut my finger (I really do not know what happened there!) I was finally looking at this super-duper bracelet:


Bracelet with "Quirks" beads and wirework


It's photographed on my lap, by the way, that's where I've been making it. I'm just glad that none of the duck feathers from the blooming pillow have got into the shot!


But. The bracelet was initially too short. I added this little red bead on the left at the top next to the clasp. Now it is too long. Oh, dear.

Let's see what tomorrow brings! :)xx

Sunday 27 November 2011

Flowers for Jo

Bead of the Day: "Flowers for Jo"


About ten days ago I came across a post on Facebook. I couldn't make out who the lady was. I was sad, but it was kind of impersonal, because I didn't know. Thanks to GBUK's email received tonight, now I realise that we lost a great lampworker and a wonderful, wonderful person. So this post is dedicated to Jo Rohrer.


In those "olden" days I didn't know anything about lampwork or beads or making jewellery. One day I was happily walking around WHSmith's - oooooh, I don't know, four, five years ago? - when these beautiful beads caught my eye. Turquoise and red on the cover of Bead magazine. So I bought the mag. And discovered a whole new world! And it was only because of the beautiful beads on the cover! The beads, as it happened, had been made by Jo Rohrer.


But it was just a name then. We know the names - the stars of the lampwork community: Diana East, Ray Skene, Sally Carver... Many from abroad - Loren Stump, Akihiro Ohkama, Corina Tettinger, the list goes on... Only rarely we can see these amazing people, usually it's during demonstrations; it's quite difficult (at least it is for me) to come up to them and have a chat or possibly to become friends.


As time passed, I started making my own beads and jewellery, I went to fairs and various events. And once I was lucky to meet Jo. It was in Dulwich. She came up to us and we chatted, and she showed me her beads and her display. She said she loved fairs because they gave her a chance to meet her customers and her fellow bead artists. I remember her beads: elongated and flattened, in beautiful organic greens. After that meeting we wrote to each other; she gave me advice, congratulated me on my lampworking successes and simply just kept in touch. She was always very kind and generous sharing her knowledge: which fairs to go to, which events are cheaper than the others, what a pain Double Helix can be...


I never suspected that she was ill. Last time she wrote to me was about my book; she said she'd been reading it and it was very good and so beautiful. It was two weeks before she left us.


She was wonderful. Inspirational and very kind. My thoughts are with the ones who were closest to her.

Thursday 10 November 2011

The Bead Awards

I can just sit here at my computer and read other people's blogs - very happy! But I've got to tell you a little about the British Bead Awards which took place in London on 15th October.


The Big Bead Show was very well attended, with lots of marvelous things to buy and many people to say hello to.

The creations of the Bead competition finalists were displayed in the Sports Bar. There were some gorgeous pieces. I can sympathise with the judges: I liked everything, and it must have been soooo difficult to decide who the winners were.

My "Matrioshka" set won 1st place in the Handmade Glass Beads and Components category. Unfortunately, we missed the actual ceremony: on the way to the racecourse we took the wrong turning and ended up somewhere else. I'd like to say Congratulations and Well done! to everybody who took part in this competition, especially to those who I know personally and who are some of my favourite people in the glass bead making community.

Chloe Menage, editor of Bead, agreed to have this pic taken with me. Thank you, Chloe, for the super event (and the award!), I have really enjoyed it! 

Tuesday 8 November 2011

Back Again

Beads of the Day: "Indian Summer"

Hello again!


I cannot believe that more than a month has passed again since my last blog! And I was starting so well, really determined to keep on writing. I looked at the date of the last blog: two days later my eldest daughter was in hospital undergoing a very serious operation. So I hope you'll understand why I haven't written for some time. I've prepared a separate blog about it, but every time I try to read it through and possibly edit it, I get very emotional again, so it's still difficult at the moment. My daughter is OK now.

The beads of the Day are the "Indian Summer" set in warm shades of oranges, yellows and turquoise: like those beautiful days in autumn with the quiet sun and golden leaves, when it is still warm, but you know that it's not going to last for long, as mornings are getting colder. We had this weather only last week, but now it's turned so cold, and one of my customers has mentioned that they've had the first frost: winter is coming.

There have been good things and bad things happening - isn't life all in stripes, a bit like a zebra, I suppose. And I'll be posting more, as some things are very well worth mentioning here. At the minute I just want to say that I am back, and hopefully will stay that way.:)

Thursday 22 September 2011

Making Triangular Spacers

Bead of the Day: "Triangular Spacers"


The Blogger wouldn't allow me either to see my followers, or to comment on other people's blogs - very distressing. And what are all these spaces between paragraphs, as soon as I publish my blog? I'll have to look into it.

Yesterday I wasn't doing much in terms of bead-making, unfortunately. Very rarely, but I get a day, that no matter how inspired and motivated I am, I just feel drained of all energy, and I can't do anything. Maybe, it's got something to do with the atmosphere, as it was raining yesterday. But today is sunny, and I'm all ready to make something great.

So todays' Bead of the Day is Spacer Beads. Talking about spacers: I find it quite hard to make these lovely tiny thin spacer beads which are so popular at the moment. As I found out of experience, I have to make a really very thin disc, and then quickly heat it on each side (literally, almost to pass it through the flame, the heat should be minimal), but of course I have to be careful not to overheat it, because this is when the problems start! With overheating the bead immediately becomes thicker, loses its "thin loveliness" (ha-ha! this sounds ridiculous!), and if I am completely unlucky, it becomes lopsided. Then there is only one remedy - to add more glass, but in this case forget about the spacer being thin, it'll be just like a normal plump bead, only smaller.

So! I've come up with this brilliant idea - brilliant for me, because, I have to admit, more often than not, I bugger up these little thin spacers and instead get normal small beads. And what I do when this happens is I take my marver and turn the round bead into this pretty triangular one. In my book I remember writing about square spacers - ooh, this was AGES ago, I mean, two years ago - everyone who does lampwork knows that two years means a lot in terms of your development as a lampworker. And I have to say, square spacers are actually trickier to make, as they require both pairs of four sides being parallel. With a triangular shape, however, you don't have to be so precise.


I just love them! And they have been selling quite well in sets, so hopefully, my customers love them too!
"Atlas" bead set with triangular spacer beads on the ends

Wednesday 21 September 2011

Lilies and Petals, Planets and Implosion

Bead of the Day: "Planetary"


Yesterday was spent developing this new design. These beads are tricky to photograph, because there is so much going on inside - they are the ones for "gazing into", if you know what I mean. There are bubbles around the top and the bottom (you can't see those in this pic), there is a core with a lovely "lily" design and a band of silvered ivory and goldstone around the encased "petals".


Ah, this "lily" design... I literally spent days mastering it. The thing was, I bought this book by Karen J Leonardo, I suppose with the main purpose to check out the competition. And there it was, I think she called it "lilypad" or something like that. I'd seen beads with this design before, and if I remember correctly, Sally Carver won a competition with them recently. So all summer I tried and tried and tried, with various degree of success, but the beads produced by me using this "imposion" technique, were far from the image I had in my head. I found this technique extremely difficult.


One day I sat there, all upset, thinking hard about how I could achieve the look of the lilies I wanted. And I thought that it would be impossible for anybody, ANYBODY, to have temperature control that perfect, to get the lovely petals around and along the mandrel by only relying on the flame. But of course, silly me!, it's a different technique altogether: this one involves layers and layers of dots being covered with bands of large amounts of clear glass, heating and waiting for the dots to get elongated!

"Yellow Waterlilies" bead set, currently for sale on ebay


Guys, I don't know about you, but here it was a real revelation. So many people use this simple design in their work, and it looks gorgeous. Well, simple I say, of course I had to practise, but I also came up with some lovely colour combinations, and I have to write another blog on that.


Coming back to the "Planetary" design, I did use a little of the "implosion" technique here: I made a core of ivory, then created a disc out of clear on one of the core's ends. Then I used Double Helix Ekho for the dots to go onto the disc and melted them: Ekho on ivory here gives this great organic palette that I like so much, and you don't have to spend time reducing it either. Encased, put some goldstone and silvered ivory around with dots of Double Helix Calipso on each end, made indentations for future bubbles, encased again. Every technique comes handy!

Tuesday 20 September 2011

New Beginning

Bead of the Day: "Dogdaisies"


I've decided to start again after so many months of not writing anything. There's been a lot happenning, just like, I'm sure, with everyone: you get up in the morning, you live through the day, evening comes, you've done your work, you've sent your emails, you've spoken to your family. Every day seems to be the same, but it's not, every day brings something amazing.


So to re-cap what's been happenning: my children have finished school, having had A level exams, and now they will be going to uni very shortly - hopefully, I'll keep up with my blogging, so you'll hear all about that. We've been to Russia for a couple of weeks, we could only go for a short break this year as we had to get back for the "Results!" day; we stayed at my parents datcha (a little country house) near Moscow. I've been posting on FB here and there, I even managed to upload some pix. I've sent off my entry to the gallery section of "The Flow" magazine in US for the annual "Women In Glass 2011" issue together with some info about my book, but I haven't heard anything from them, so I'm not sure if it'll make it into the mag. I've also sent an entry into one of the competitions in a British mag, but I don't think I'm allowed to blog about it just yet (sad face). I've started putting some beads into my etsy shop; I thought I might as well since I've got it. We are just about to start looking for a new home, as the rent on this house in Derbyshire is coming to an end and I'm very much looking forward to going somewhere else!!! (a very happy face).


These seem to be the major things. I've been making loads of beads, though working in the conservatory in summer turned out to be not such a great idea: when it's warm, it's really hot in there, and opening windows only helps a little, as the wind goes everywhere, including around my torch, I lose control of my temperature etc. - you know. Also I had to move my "station" to stand at a different angle to the rising sun: why do we put conservatories on the sunny side of the house? It's silly, honestly: too hot and too bright, you have to put on sunglasses and a bikini to be there. So I'm really happy now with the autumn coming, as it means one thing: more bead making!


I've also decided to start this new thing: Bead of the Day. I've pinched the idea from Rod's agent; he does "Mood of the Day". So I suppose my Bead can reflect my mood to a certain degree. And today it's "Dogdaisies" (not one, but a couple of beads) - my very new design, though this particular set has already been sold. Bright yellows and whites, dots of green and lots of tiny bubbles to put a smile on everybody's face.

Sunday 24 April 2011

Thursday 24 March 2011

Busy, Busy!

So busy, that's how it's been, and that's why I haven't posted anything since my blog after Moscow. I've been making the prize beads for the GBUK competition and more jewellery to send off to Cooper Gallery in Barnsley.

I remember writing about the prize beads before. The idea then was to make them of a design from my book, and I already had half of the planned number of beads made (even with my oxycon playing up all along!). I thought that a set of beads would probably be better than one focal: I make various types of focals, and people like different things. But with a set, even if the person who wins them doesn't like them, she or he can always make a couple of pieces of jewellery and sell them and get some money - an incentive to participate in the next year's competition!

When I got back from Moscow I found out that I had been awarded the Dan Klein Travel Bursary by the Contemporary Glass Society (CGS) worth £500. It was amazing news! I planned to go to Japan to learn how to make tonbodama, traditional japanese glass beads, in order to write a book on the methods and designs associated with them. A couple of days later we saw the terrible events in Japan... But I'm still determined to go there this coming summer.

So Rod suggested that I make tonbodama beads as a prize for this year's GBUK Bead and Jewellery Competition taking place at Flame Off (8t-9th April). What a great idea! The only thing is, it takes me about 40 minutes to make one of these beads. The most difficult part is to make the shape. When I wrote a tutorial for the book, it simply read "Make a barrel-shaped bead". Of course, to make a nice plump barrel-shaped bead, with "dimples", with a slight curve... is a tutorial in itself. I should actually write one with step-by-step pix, as I have by now figured out how to make this shape quicker, but still it takes time. Then, there is the division of the surface of the bead into three parts for three flowers. The next thing is to make sure there aren't any signs of pulling left - so you need to flame-polish really well. The last difficult bit for me is right at the very end: to reduce the accent dots of the Iris Dark Blue reduction frit stringer, because if you leave them just a touch longer in the flame, the beautiful porcelain white surface of the bead goes yellow or even brown-black within a tenth of a second, and the whole bead goes to the bin!

But here they are, sent off and received safely yesterday by Charlotte, our Chairwoman:


I have to say that I've improved, and now it takes me about 30 minutes to make one.

I've also sent off my entry to the bead competition, but although I'm really excited about the bead I've made I am not allowed to blog about it, so it'll have to wait until the middle of April!

Tuesday 15 March 2011

From Russia With Love!

Helloooooo, I'm back!

This was Moscow a couple of weeks ago, out of the window of my parents' flat:

As you can see, it was all covered in snow. Actually, this was when the snow started melting! My parents' apartment looks out to a kindergarten, it's a shame it was a bit too early when I was taking this pic, as you can't see the kiddies - they are so funny in the snow! The problem is, they just have a good time and enjoy themselves - winter is a wonderful time, you don't get mucky, just a little wet, but it's not a problem, you go inside and put your coats, hats, gloves and boots on the radiator - until the afternoon. This kindergarten looks lovely in the evening, when the street lights are on, it all looks so mysterious... Twilight used to be my fave time of day.
Apparently, the week I arrived was the coldest they had for the whole winter, temperatures going down to -25C during the day and below 30 at night. I was lucky I'd taken a proper winter coat with me, but I forgot to take a hat and I had to borrow my mum's spare pair of fur boots, as my Doc Martins just weren't cut for that sort of temperature. When you live in England, you tend to forget how cold it is out there in the world and what people have to cope with every day.

And this is the road to Domodedovo, where I landed and where I was taking off:


Domodedovo is OK, nobody can enter without their documents being checked first, so no problem.
I've had a good trip, with most of the things done on my little list. I've seen my relatives, I've been to a 55th birthday party (this is the pension age for women in Russia, so a lot of women have a celebration), I nearly met with one of my old classmates - we'll try again next time!- and I talked to a couple of Russian publishers regarding my book which I am translating into Russian. It's all been very positive indeed.
I came home and there was some amazing news waiting for me! But I have to stop now and I'll talk about it all in my next blog.

Sunday 6 February 2011

Flame Off Prize - Please Enter to Win!

I saw an Asian glass artist talking to his glass-making gods before starting his work. Every time I want to make beads now, I come up to my oxycon and say, "Please switch on, please switch on!". Hopefully, I'll be able to take it to Tuffnells next week for a service.

Yesterday I was lucky (the oxycon did switch on almost immediately) and I managed to start on the set of beads which I'm planning to give away as one of the GBUK prizes. This year they called for sponsorship of prizes for the GBUK Bead and Jewellery Competition which will be held at the Towcester Flame Off (http://www.tuffnellglass.com/contents/en-uk/otherurl.html?url=http://www.tuffnellglass.com/contents/en-uk/d65.html) in order to popularize British handmade glass beads. For entry requirements and to download the entry form please go to http://www.gbuk.org/pages/gbuk-bead-jewellery-competition-2011/#more-149. To enter the jewellery part of the Competition, you don't have to be a GBUK member! I decided to make some of my "Mucha" design, the full tutorial is available in my book. So far I'm pleased with what I've made:


These are bright, with orange and turquoise twisties and dots (the photo, as usual with me, has been taken in natural light). The difference between these and the ones described in the book is that I have inserted some hand-pulled murrini in the same colours, so they look even better! (It was getting too much for the book, so at the time I couldn't explain the murrini technique, but I can do it in the second volume). There are only four tabs at the minute, but I'm planning to make a set which will also include bigger lentils, and some of the beads will have turquoise or orange opaque background.

I have also been proof-reading busily, as Rod wanted to send the third part of the Demi-Monde series off to his agent by the end of Friday. When I'm proof-reading, it takes me a lot longer, as I almost pronounce mentally every word I read. It's quite time-consuming, but I do enjoy it, as I get to read the drafts of novels Rod writes! Then we discuss them, and sometimes, if I'm lucky, I even manage to give Rod a good idea for something. Or so he says. By the time he finishes with those sorts of ideas I don't recognise them, but it's even better, because he is great coming up with twists and turns in his stories.


So off to make some more beads - oxycon permitting!

Friday 4 February 2011

More Happy Ivory and Cool Fossil Beads!

I've been busy, but not with making beads. Well...

It was my birthday last Sunday (lovely lovely day! everybody was so kind to me, I got great presents from my family and lots of good wishes from my Facebook friends!), and, as you do, I decided to try and make some beads. "To try" - that's because, as you know, my oxycon has been disagreeable lately, I really need to take it to Tuffnell for a good check. And guess what! - on Sunday it started working and I did manage to make some beads after a long time! Here they are:

As you can see, I'm still experimenting with the Effetre Cool Fossil, I just lllllove this earthy organic feel it adds to the Ivory. The bead on the left has a Dark Ivory base with large dots of Cool Fossil, worked very hot, until the glass started moving, then cooled, shaped and decorated with a twistie of Ivory and Intense Black and hand-pulled murrini of the same composition. (I was told it looks very Japanesee - yippee!). The bead in the middle is of Ivory and Cool Fossil base, but the Cool Fossil has been added in stripes, again worked very hot until it started "breaking" or "splitting" - you can see it by the "waves" created; the simple decoration here is four chips of hand-pulled murrini from a previous bead-making session (described in my blog "Cool Experimenting Part II"). The last bead, the one on the right, started as Effetre Transparent Light Amber (the photos have been taken in natural light, on a grey day - today! so you can't really see how much happy amber-coloured light this bead can radiate), then a layer of Effetre Dark Ivory was added to the surface so that parts of the Amber were left uncovered. I applied a twistie (again described in detail in "Cool Experimenting Part II") on the very edge of the Ivory and paddled it quite well, though I was keen to leave it slightly raised. At the end I decorated each side of this bead with a chip of my own murrini made in the following way:


Start with Dark Ivory, encase it with Transparent Light Amber, encase it again with Dark Ivory, cut "furrows" in the Ivory and put in stripes of Reichenbach Dark Multi stringer. When you apply this murrini, the trick is to paddle it very gently and not to overheat it so that not to spoil the complex middle. Otherwise, as you, probably, know, it will be "eaten" by the dark lines - a pretty effect, but only if you want it!
I like the etching effect on ivory, so this is just what I did: the first bead has been fully etched, the second has the lovely murrini with some shiny mirror and multicolour reduced Double Helix glass effect left unetched, and the third... Believe me, it's a work of art! I mean, of etching art! The stripes which, again, have the reduced reactive Double Helix in their composition (which is, of course, extremely difficult to catch on a photo!), have been left uneched, together with the lovely transparent Light Amber. But the Ivory part and the murrini have been etched. It looks great. I will be putting all of these on ebay over the next couple of weeks. I have to tell you that I'll be going to Moscow soon for quite a long time, but my ebay listings will be managed by Rod (he's been so kind!).
Ah, this is only a small part of what I've been up to, but the time is running out, so I'll have to come back on this in my next blog. :)!

Saturday 29 January 2011

The Prize Has Arrived!


That was me two days ago!


Time flies, and I was positive I was doing a blog on that day, but something happened, which was my oxycon went caputski - whatever the spelling is, the idea is the same: it stopped working and nothing would make it change its mind, so I was trying to sort that little problem out (no, I haven't solved it yet).


But back to the beginning. I was absolutely thrilled when a package arrived from Jane Tyrrell of "Jane's Jems and Jewels" and this was why I had a big smile on my face. I llllove receiving parcels, especially when it's a prize! Everything was really nicely wrapped, with ribbons and a card:


Whenever I unwrap something I feel a little upset that all the beautiful wrapping is going to be thrown away! I used to keep ribbons and things, but when we started moving houses I had to say goodbye to my treasures, as it was getting a bit out of hand, my collection of wrapping things was getting much too big! So when I opened the parcel from Jane, there were these lovely cards and the necklace presented in a pretty organza bag with little sparkly bits on it (I haven't seen one like this before).


And these are two more shots of my prize card and necklace - I love taking photos of pretty things!!! As you can see, Jane's handmade jewellery and cards are very individual, so check out her shop if you haven't done so yet (www.etsy.com/shop/janesjemsandjewels), I'm certainly coming back!

Friday 28 January 2011

Second Review on Amazon!

I've just gone to Amazon.co.uk and what do I see but an excellent second review of "Glass Bead Jewelry Projects"! Wow, thank you so much, Lynsey! Here it goes:

"5.0 out of 5 stars Beautiful and inspirational Book, 27 Jan 2011
By
lynsey adams "Kanga" (England) - See all my reviews(VINE VOICE)
This review is from: Glass Bead Jewelry Projects (Paperback)

This is a beautiful book, and very good value, sold at a huge discount from the cover price. It is one of the few lampwork books published in the UK, so that you can be reasonably sure that the materials recommended are readily available.
What I particularly liked was that the author is not only giving us detailed instructions on some stunning projects, but from her own experience tells of the expensive mistakes and pitfalls to be avoided.
As another reviewer says, it isn't difficult to find a lampworking book that tells you the basics of making a bead, the tools needed and how to set them up. Where this book really scores, is that the author goes on to illustrate the book with her own extremely beautiful beads, with instruction on not only how to make them, with detailed step by step illustrations, but follows this with inspiring ideas on how to make each particular type of bead into a piece of stunning jewellery.
She begins by telling us exactly what type and quantity of glass to use for the bead: 'if you want your bead to look exactly like mine you will need:', and follows this with the same information on the materials and tools needed to make the jewellery. Experienced beadmakers might not need this, but it is very helpful to a near beginner.
Projects are graded into 'beginners', intermediate' and 'advanced' level, and although I think that it would certainly take a good deal practice to obtain the results in the book, even to a near beginner like myself they do actually look achieveable. There are a few exceptions to this towards the end of the book which look much more difficult, but they are in the 'advanced' section and could be worked toward. However, even the beads in the 'beginners' section are stunningly beautiful and not just padding for the book.
This is also a great book for furthering your own ideas and designs if you are past the stage of needing step by step instructions. Change a colour here, transfer a technique there, and you can use the beads shown in the book as templates for you own unique beads and jewellery.
Many other lampworking books show beads made by other artists - beautiful to look at, but often one is left frustrated and wondering, 'how did they DO that?'. This book shows the author's work exclusively, and I don't think it suffers from doing that, as the work is of a very high standard. It reads like a series of excellent and detailed personal tutorials, written in an accessible and friendly way.
One more thing that I particularly liked - and this is only a very personal opinion - there is not a sign of any glass animal beads, distorted faces, vessels, cottages, gnomes, cartoon characters, baskets of flowers, or any other type of hideously naff, (albeit technically skilful), creations so beloved by authors of certain other lampworking books.
If you want ideas and inspiration, with detailed instructions for making beautiful beads and jewellery, with this book you just can't lose. "

Wednesday 26 January 2011

"Cool" Experimenting Part II - Looks Like a Win!

Yesterday I was making more beads with E cool Fossil. I decided to wrap it up with silver foil, and the result is shown on photo 1. Maybe, I needed to heat it more, but the shape of the base bead was so good that I was reluctant to make it back into molten glass. So it just darkened without producing any amazing effects. But don't worry, we bead artists are inventive when it comes to decorating. I wound some twistie left from the previous session (which, if I remember, was E cool Fossil and DH Aurae), paddling it down firmly, and then applied several chips of my murrini (this one is E Ivory with R Dark Multi). As the R stripes decided to be rather dark and didn't want to change into any other colour, I applied dots of DH Aurae with a stringer, reduced them to give this metallic effect and then decided to stop and put it away.

Next I had a better idea. Using just the Fossil on its own gave me quite a dark shade, which I wasn't entirely happy with. So I made the base bead with E Ivory and then decorated it randomly with Effetre cool Fossil, melted it in completely and kept on heating the bead up to the point when the middle of the bead started to move. It took me some time, but the result was great: the Ivory together with Fossil started "to break", the two colours interacting with each other, creating a lovely stony pattern. I cooled the bead down a little, shaped it and applied three murrini chips around the middle of the bead. The rest was even simpler: heat the middle of the murrini, poke it with a spare mandrel (that's what I do anyway), apply a large drop of crystal clear on top of the indentation, heat and watch how the bubble apprears. The very last bit was to apply some dots of DH Aurae (why is it always Aurae - oh, I've got an Aurae stringer right here!) and to reduce them a little. How more organic can you go?

Photo 3 shows a close-up of this lovely marble effect. The hand-pulled murrini here consists, if I remember correctly (I really need to start putting it all down for my next book), of Effetre Ivory, Intense Black, Double Helix Aurae (again) and somewhere there there is also Effetre Med Amber encasing it all. I've already got a name for them: "Stone Blooms" (Rod helped, as usual).
I was so busy that I'd run out of prepared mandrels! But I've still got to work out how to make nice beads with Effetre cool Kiwi...

Yesterday I found out that I'd won a lovely prize from Jane Tyrrell, a talented jewellery designer who lives in the UK. It was very kind of Jane to organise this giveaway prize draw, and I was thrilled to be pronounced one of the two winners! (A big Thank You to Jane's son!!!) So now I can't wait to see the lovely necklace designed and made by Jane, and some beautiful cards handmade by Jane which she will be posting to me. I was so happy that I went to Jane's Etsy shop (www.etsy.com/shop/janesgemsandjewels) and bought some more of her cards - they are really pretty!

A great day!


Tuesday 25 January 2011

"Cool" Experimenting Part I

Yesterday was a pleasant day - I mean, it wasn't freezing as usual. Although the temperature was only about +4C and it was grey, there was hardly any cold wind, so it felt warm (-ish). I'd been waiting for the moment to get to my torch to try out my new ideas and these "cool" Effetre colours I'd just bought.

To start with, the E "cool" Fossil didn't like my way of introducing it into the flame. I even did my little trick with touching the tip of the glass with my fingers before it went in - no, there were bits flying, so this is something to remember: to be extra careful at the beginning. The first photo shows a bead with the E cool Fossil base decorated with a twistie of R Dark Multi and E Ivory. Clearly, the twistie was too dark for this combination, so forget about this one. The next photo has an E Ivory base bead with a twistie of E cool Fossil and DH Aurae - obviously, the twistie should have been less "twisted" with bigger part of the Fossil to be better seen. Never mind, there is always tomorrow, i.e., today!


So when I realised that I wasn't getting anywhere with the new glass, I went back to my old "Art Nouveau" design (Mucha - the tutorial is included into my book) and I was relatively pleased with the result.


Some of my other experiments were twisting R Dark Multi with E Ivory and working it in various temperature environments, but it kept coming out green, or much too dark for a pleasing effect. Here is the pic:


All in all, a good bead designing day and I can't wait to start it again today!