Sunday, 6 February 2011

Flame Off Prize - Please Enter to Win!

I saw an Asian glass artist talking to his glass-making gods before starting his work. Every time I want to make beads now, I come up to my oxycon and say, "Please switch on, please switch on!". Hopefully, I'll be able to take it to Tuffnells next week for a service.

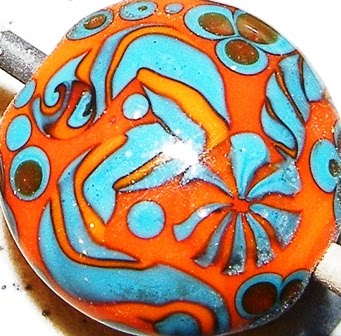
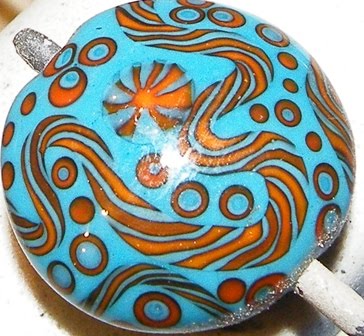
Yesterday I was lucky (the oxycon did switch on almost immediately) and I managed to start on the set of beads which I'm planning to give away as one of the GBUK prizes. This year they called for sponsorship of prizes for the GBUK Bead and Jewellery Competition which will be held at the Towcester Flame Off (http://www.tuffnellglass.com/contents/en-uk/otherurl.html?url=http://www.tuffnellglass.com/contents/en-uk/d65.html) in order to popularize British handmade glass beads. For entry requirements and to download the entry form please go to http://www.gbuk.org/pages/gbuk-bead-jewellery-competition-2011/#more-149. To enter the jewellery part of the Competition, you don't have to be a GBUK member! I decided to make some of my "Mucha" design, the full tutorial is available in my book. So far I'm pleased with what I've made:


These are bright, with orange and turquoise twisties and dots (the photo, as usual with me, has been taken in natural light). The difference between these and the ones described in the book is that I have inserted some hand-pulled murrini in the same colours, so they look even better! (It was getting too much for the book, so at the time I couldn't explain the murrini technique, but I can do it in the second volume). There are only four tabs at the minute, but I'm planning to make a set which will also include bigger lentils, and some of the beads will have turquoise or orange opaque background.

I have also been proof-reading busily, as Rod wanted to send the third part of the Demi-Monde series off to his agent by the end of Friday. When I'm proof-reading, it takes me a lot longer, as I almost pronounce mentally every word I read. It's quite time-consuming, but I do enjoy it, as I get to read the drafts of novels Rod writes! Then we discuss them, and sometimes, if I'm lucky, I even manage to give Rod a good idea for something. Or so he says. By the time he finishes with those sorts of ideas I don't recognise them, but it's even better, because he is great coming up with twists and turns in his stories.


So off to make some more beads - oxycon permitting!

Friday, 4 February 2011

More Happy Ivory and Cool Fossil Beads!

I've been busy, but not with making beads. Well...

It was my birthday last Sunday (lovely lovely day! everybody was so kind to me, I got great presents from my family and lots of good wishes from my Facebook friends!), and, as you do, I decided to try and make some beads. "To try" - that's because, as you know, my oxycon has been disagreeable lately, I really need to take it to Tuffnell for a good check. And guess what! - on Sunday it started working and I did manage to make some beads after a long time! Here they are:

As you can see, I'm still experimenting with the Effetre Cool Fossil, I just lllllove this earthy organic feel it adds to the Ivory. The bead on the left has a Dark Ivory base with large dots of Cool Fossil, worked very hot, until the glass started moving, then cooled, shaped and decorated with a twistie of Ivory and Intense Black and hand-pulled murrini of the same composition. (I was told it looks very Japanesee - yippee!). The bead in the middle is of Ivory and Cool Fossil base, but the Cool Fossil has been added in stripes, again worked very hot until it started "breaking" or "splitting" - you can see it by the "waves" created; the simple decoration here is four chips of hand-pulled murrini from a previous bead-making session (described in my blog "Cool Experimenting Part II"). The last bead, the one on the right, started as Effetre Transparent Light Amber (the photos have been taken in natural light, on a grey day - today! so you can't really see how much happy amber-coloured light this bead can radiate), then a layer of Effetre Dark Ivory was added to the surface so that parts of the Amber were left uncovered. I applied a twistie (again described in detail in "Cool Experimenting Part II") on the very edge of the Ivory and paddled it quite well, though I was keen to leave it slightly raised. At the end I decorated each side of this bead with a chip of my own murrini made in the following way:


Start with Dark Ivory, encase it with Transparent Light Amber, encase it again with Dark Ivory, cut "furrows" in the Ivory and put in stripes of Reichenbach Dark Multi stringer. When you apply this murrini, the trick is to paddle it very gently and not to overheat it so that not to spoil the complex middle. Otherwise, as you, probably, know, it will be "eaten" by the dark lines - a pretty effect, but only if you want it!
I like the etching effect on ivory, so this is just what I did: the first bead has been fully etched, the second has the lovely murrini with some shiny mirror and multicolour reduced Double Helix glass effect left unetched, and the third... Believe me, it's a work of art! I mean, of etching art! The stripes which, again, have the reduced reactive Double Helix in their composition (which is, of course, extremely difficult to catch on a photo!), have been left uneched, together with the lovely transparent Light Amber. But the Ivory part and the murrini have been etched. It looks great. I will be putting all of these on ebay over the next couple of weeks. I have to tell you that I'll be going to Moscow soon for quite a long time, but my ebay listings will be managed by Rod (he's been so kind!).
Ah, this is only a small part of what I've been up to, but the time is running out, so I'll have to come back on this in my next blog. :)!

Saturday, 29 January 2011

The Prize Has Arrived!


That was me two days ago!


Time flies, and I was positive I was doing a blog on that day, but something happened, which was my oxycon went caputski - whatever the spelling is, the idea is the same: it stopped working and nothing would make it change its mind, so I was trying to sort that little problem out (no, I haven't solved it yet).


But back to the beginning. I was absolutely thrilled when a package arrived from Jane Tyrrell of "Jane's Jems and Jewels" and this was why I had a big smile on my face. I llllove receiving parcels, especially when it's a prize! Everything was really nicely wrapped, with ribbons and a card:


Whenever I unwrap something I feel a little upset that all the beautiful wrapping is going to be thrown away! I used to keep ribbons and things, but when we started moving houses I had to say goodbye to my treasures, as it was getting a bit out of hand, my collection of wrapping things was getting much too big! So when I opened the parcel from Jane, there were these lovely cards and the necklace presented in a pretty organza bag with little sparkly bits on it (I haven't seen one like this before).


And these are two more shots of my prize card and necklace - I love taking photos of pretty things!!! As you can see, Jane's handmade jewellery and cards are very individual, so check out her shop if you haven't done so yet (www.etsy.com/shop/janesjemsandjewels), I'm certainly coming back!

Friday, 28 January 2011

Second Review on Amazon!

I've just gone to Amazon.co.uk and what do I see but an excellent second review of "Glass Bead Jewelry Projects"! Wow, thank you so much, Lynsey! Here it goes:

"5.0 out of 5 stars Beautiful and inspirational Book, 27 Jan 2011
By
lynsey adams "Kanga" (England) - See all my reviews(VINE VOICE)
This review is from: Glass Bead Jewelry Projects (Paperback)

This is a beautiful book, and very good value, sold at a huge discount from the cover price. It is one of the few lampwork books published in the UK, so that you can be reasonably sure that the materials recommended are readily available.
What I particularly liked was that the author is not only giving us detailed instructions on some stunning projects, but from her own experience tells of the expensive mistakes and pitfalls to be avoided.
As another reviewer says, it isn't difficult to find a lampworking book that tells you the basics of making a bead, the tools needed and how to set them up. Where this book really scores, is that the author goes on to illustrate the book with her own extremely beautiful beads, with instruction on not only how to make them, with detailed step by step illustrations, but follows this with inspiring ideas on how to make each particular type of bead into a piece of stunning jewellery.
She begins by telling us exactly what type and quantity of glass to use for the bead: 'if you want your bead to look exactly like mine you will need:', and follows this with the same information on the materials and tools needed to make the jewellery. Experienced beadmakers might not need this, but it is very helpful to a near beginner.
Projects are graded into 'beginners', intermediate' and 'advanced' level, and although I think that it would certainly take a good deal practice to obtain the results in the book, even to a near beginner like myself they do actually look achieveable. There are a few exceptions to this towards the end of the book which look much more difficult, but they are in the 'advanced' section and could be worked toward. However, even the beads in the 'beginners' section are stunningly beautiful and not just padding for the book.
This is also a great book for furthering your own ideas and designs if you are past the stage of needing step by step instructions. Change a colour here, transfer a technique there, and you can use the beads shown in the book as templates for you own unique beads and jewellery.
Many other lampworking books show beads made by other artists - beautiful to look at, but often one is left frustrated and wondering, 'how did they DO that?'. This book shows the author's work exclusively, and I don't think it suffers from doing that, as the work is of a very high standard. It reads like a series of excellent and detailed personal tutorials, written in an accessible and friendly way.
One more thing that I particularly liked - and this is only a very personal opinion - there is not a sign of any glass animal beads, distorted faces, vessels, cottages, gnomes, cartoon characters, baskets of flowers, or any other type of hideously naff, (albeit technically skilful), creations so beloved by authors of certain other lampworking books.
If you want ideas and inspiration, with detailed instructions for making beautiful beads and jewellery, with this book you just can't lose. "

Wednesday, 26 January 2011

"Cool" Experimenting Part II - Looks Like a Win!

Yesterday I was making more beads with E cool Fossil. I decided to wrap it up with silver foil, and the result is shown on photo 1. Maybe, I needed to heat it more, but the shape of the base bead was so good that I was reluctant to make it back into molten glass. So it just darkened without producing any amazing effects. But don't worry, we bead artists are inventive when it comes to decorating. I wound some twistie left from the previous session (which, if I remember, was E cool Fossil and DH Aurae), paddling it down firmly, and then applied several chips of my murrini (this one is E Ivory with R Dark Multi). As the R stripes decided to be rather dark and didn't want to change into any other colour, I applied dots of DH Aurae with a stringer, reduced them to give this metallic effect and then decided to stop and put it away.

Next I had a better idea. Using just the Fossil on its own gave me quite a dark shade, which I wasn't entirely happy with. So I made the base bead with E Ivory and then decorated it randomly with Effetre cool Fossil, melted it in completely and kept on heating the bead up to the point when the middle of the bead started to move. It took me some time, but the result was great: the Ivory together with Fossil started "to break", the two colours interacting with each other, creating a lovely stony pattern. I cooled the bead down a little, shaped it and applied three murrini chips around the middle of the bead. The rest was even simpler: heat the middle of the murrini, poke it with a spare mandrel (that's what I do anyway), apply a large drop of crystal clear on top of the indentation, heat and watch how the bubble apprears. The very last bit was to apply some dots of DH Aurae (why is it always Aurae - oh, I've got an Aurae stringer right here!) and to reduce them a little. How more organic can you go?

Photo 3 shows a close-up of this lovely marble effect. The hand-pulled murrini here consists, if I remember correctly (I really need to start putting it all down for my next book), of Effetre Ivory, Intense Black, Double Helix Aurae (again) and somewhere there there is also Effetre Med Amber encasing it all. I've already got a name for them: "Stone Blooms" (Rod helped, as usual).
I was so busy that I'd run out of prepared mandrels! But I've still got to work out how to make nice beads with Effetre cool Kiwi...

Yesterday I found out that I'd won a lovely prize from Jane Tyrrell, a talented jewellery designer who lives in the UK. It was very kind of Jane to organise this giveaway prize draw, and I was thrilled to be pronounced one of the two winners! (A big Thank You to Jane's son!!!) So now I can't wait to see the lovely necklace designed and made by Jane, and some beautiful cards handmade by Jane which she will be posting to me. I was so happy that I went to Jane's Etsy shop (www.etsy.com/shop/janesgemsandjewels) and bought some more of her cards - they are really pretty!

A great day!


Tuesday, 25 January 2011

"Cool" Experimenting Part I

Yesterday was a pleasant day - I mean, it wasn't freezing as usual. Although the temperature was only about +4C and it was grey, there was hardly any cold wind, so it felt warm (-ish). I'd been waiting for the moment to get to my torch to try out my new ideas and these "cool" Effetre colours I'd just bought.

To start with, the E "cool" Fossil didn't like my way of introducing it into the flame. I even did my little trick with touching the tip of the glass with my fingers before it went in - no, there were bits flying, so this is something to remember: to be extra careful at the beginning. The first photo shows a bead with the E cool Fossil base decorated with a twistie of R Dark Multi and E Ivory. Clearly, the twistie was too dark for this combination, so forget about this one. The next photo has an E Ivory base bead with a twistie of E cool Fossil and DH Aurae - obviously, the twistie should have been less "twisted" with bigger part of the Fossil to be better seen. Never mind, there is always tomorrow, i.e., today!


So when I realised that I wasn't getting anywhere with the new glass, I went back to my old "Art Nouveau" design (Mucha - the tutorial is included into my book) and I was relatively pleased with the result.


Some of my other experiments were twisting R Dark Multi with E Ivory and working it in various temperature environments, but it kept coming out green, or much too dark for a pleasing effect. Here is the pic:


All in all, a good bead designing day and I can't wait to start it again today!

Sunday, 23 January 2011

Review in Bead Magazine and "Black Swan"


Hooray, the book has been reviewed in the Bead magazine Feb/March issue. This was a very pleasant surprise indeed. So far several people mentioned that the book is good for those who are new to lampworking. My aim, of course, was also to introduce wider audience to jewellery making - there is a chapter on the various bits and pieces, like findings and techniques, needed to make the jewellery shown in the book. That, I thought, is a good feature, especially compared to other books on lampwork, which usually have an enormous amount of photos of beautiful jewellery, but never explain how to make it. Nevertheless, the review is very good, so a big Thank You to Bead magazine!
I hadn't thought about checking with Bead if they had any spare copies of the book to give away, simply because I didn't know that a review was coming, so I might write to them and ask, and maybe I'd be able to write an article for them or a tutorial similar to the ones in the book. Also I've checked their competitions. I remember that previously they planned to have an issue dedicated to glass, so I will have to check this out too: I have noticed that there is a Readers' Challenge entitled "Glass, Glorious Glass" with the deadline for entries as 9th Feb. It would be very upsetting if I've missed this one!
I went to see "Black Swan" yesterday. I don't think I would have gone had I known what it was going to be like. I expected a psychological drama, but there was a lot of gory bits, lesbian sex (no wonder, male critics love it!) and other very scary things. There were good things too: the camerawork was great, the atmosphere of the main heroine living in a small closed shell-like world was portrayed very well. But Natalie Portman, although clearly having had some serious training and having spent a lot of time and effort, isn't a professional ballet dancer, and I'm sorry to say at times I kept remembering lovely ladies-competitors in "Strictly Come Dancing". The other problem was, just like Thomas, the ballet director, noted, Portman can't act sensual, and there was no sparkle between her and Vincent Cassel. There was one funny bit: without spoiling the plot, I'll just say: hiding the body. Ha-ha-ha!!! The ending could have been a lot more dramatic. The film left me drained, so, I suppose, that should mean that it was good. I'm sure a lot of people will like it, but it wasn't for me.